Social media has fundamentally transformed the beauty industry, turning ordinary enthusiasts into influential voices that shape global makeup trends. Platforms like TikTok, Instagram, and YouTube have democratised beauty expertise, allowing creators from Seoul to Los Angeles to share innovative techniques that reach millions within hours. The makeup looks dominating your feed today aren’t born in traditional fashion magazines or backstage at runway shows—they’re crafted in bedroom studios by talented individuals who understand exactly what their audiences want to recreate. These digital pioneers have introduced techniques ranging from Korean glass skin methods to theatrical graphic liner, each trend offering unique approaches to self-expression through cosmetics. What makes these social media-driven trends particularly compelling is their accessibility; unlike haute couture runway looks, these are designed by creators who understand the reality of everyday application, limited budgets, and the desire for looks that photograph beautifully whilst remaining wearable.
Glass skin techniques popularised by korean beauty influencers
The glass skin phenomenon has transcended its Korean beauty origins to become a global obsession, characterised by skin so luminous and transparent it resembles polished glass. This trend emphasises skincare as the foundation of makeup, prioritising hydration and radiance over heavy coverage. Korean beauty influencers have perfected this aesthetic through meticulous layering techniques that create depth and dimension whilst maintaining a remarkably natural appearance. The popularity of glass skin reflects a broader shift towards skin-first makeup philosophies, where the goal isn’t to mask imperfections but to enhance your natural complexion until it practically glows from within.
Pony syndrome’s Multi-Layer hydration method for dewy complexion
Park Hye-min, known professionally as Pony, revolutionised complexion preparation with her signature layering methodology that treats skin like a canvas requiring proper priming. Her approach begins with lightweight essences applied in pressing motions rather than rubbing, allowing each layer to fully absorb before introducing the next product. This technique typically involves three to five hydrating layers, progressively moving from watery textures to richer serums. The secret lies in the patience between applications—rushing this process creates pilling and prevents proper absorption. Pony’s method demonstrates that achieving genuinely dewy skin requires investment in the preparation stages, where foundational hydration determines the final luminosity far more than any highlighter ever could.
Jeyu’s strobing and highlighting placement for reflective finish
Jeyu’s strobing techniques focus on strategic light manipulation, placing illuminating products where natural light would hit the face. Unlike traditional highlighting that concentrates on cheekbone peaks, this method extends luminosity across the bridge of the nose, cupid’s bow, and even the centre of the eyelids. The key distinction involves using liquid or cream highlighters mixed directly into foundation for an internal glow rather than surface shimmer. This creates the illusion that radiance emanates from beneath the skin rather than sitting atop it. Jeyu emphasises blending these products with dampened sponges using bouncing motions, which prevents disturbing base makeup whilst building intensity gradually. The reflective finish achieved through this method photographs exceptionally well, explaining its dominance across Instagram and YouTube beauty content.
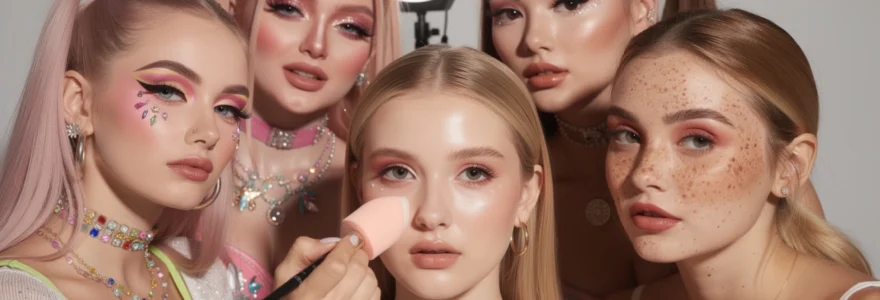
Cushion foundation application techniques from edward avila
Edward Avila introduced Western audiences to cushion foundation application methods that differ significantly from traditional foundation approaches. The cushion applicator itself—a dense, round sponge—deposits product in a bouncing, stippling motion that builds coverage without appearing heavy or cakey. Avila’s technique involves tapping the cushion puff onto the compact, then pressing it onto skin in small, overlapping circles rather than dragging or swiping. This method allows for customisable coverage, from sheer, skin-like finishes to medium coverage that still maintains translucency. The cushion format also facilitates easy reapplication throughout the day, making it ideal for maintaining that freshly applied appearance. What makes this technique particularly effective for glass skin is how it deposits pigment without disrupting the underlying hydration layers, preserving that essential dewy quality.
Skin prep protocols using essence and ampoule layering
The science behind glass skin success lies predominantly in sophisticated skin preparation
The science behind glass skin success lies predominantly in sophisticated skin preparation protocols that prioritise essence and ampoule layering. Rather than relying on a single, heavy moisturiser, Korean influencers advocate combining several lightweight formulas, each targeting a specific concern such as dehydration, dullness, or texture. You’ll often see routines that begin with a hydrating toner, followed by one or two essences, then a concentrated ampoule, and finally a gel or cream moisturiser to seal everything in. Think of this as building a moisture “sandwich”: each thin layer soaks in fully, so the end result feels bouncy rather than greasy. For makeup wearers, this approach provides a plump, even surface that grips foundation and highlighter, making it easier to achieve that reflective glass skin finish without relying on full-coverage products.
Euphoria-inspired graphic eyeliner and rhinestone embellishments
The Euphoria-inspired makeup trend has redefined what everyday eye looks can be, blending editorial artistry with social media-ready drama. Sparkling rhinestones, negative space eyeliner, and neon accents once reserved for music festivals are now part of regular “get ready with me” content. Social media creators have embraced this style because it translates brilliantly on camera: sharp lines and reflective details catch light and add visual interest, even in short clips. At its core, this trend is about storytelling through colour and shape—each liner flick or crystal cluster can express a mood, character, or narrative. For those who feel stuck in a neutral eyeshadow rut, Euphoria-inspired eyeliner is a powerful way to experiment without overhauling your entire makeup routine.
Floating crease techniques demonstrated by doniella davy
Doniella Davy, the head makeup artist behind Euphoria, popularised the floating crease eyeliner look that dominates Pinterest boards and TikTok tutorials. Instead of hugging the lash line, the liner is drawn above the natural crease, creating a graphic band of colour that remains visible even when the eyes are open. To recreate this, start by mapping your crease with eyes open in front of a mirror, lightly sketching the shape with a pencil before committing with liquid or gel liner. This approach is especially flattering for hooded or deep-set eyes, where standard eyeliner often disappears. As a rule of thumb, keeping the rest of the eye makeup minimal—soft matte shadows and lightweight mascara—lets the floating crease remain the star of your Euphoria-inspired eye look.
Gemstone and crystal placement methods for festival looks
Rhinestones and crystals are the hallmark of Euphoria-style festival makeup, and social media creators have turned their placement into an art form. Rather than scattering gems at random, artists follow the natural architecture of the face, echoing bone structure for a cohesive, intentional effect. For a wearable version, try placing small crystals at the inner corners, along the outer edge of a winged liner, or following the arc of the brow bone. Using lash glue and a pair of tweezers, press each gem onto clean, dry skin and hold for a few seconds to secure it. If you’re planning a long event or photoshoot, map out your design with nude eyeliner dots first—this blueprint keeps symmetry in check and prevents overloading the look with too many embellishments.
Neon pigment application along lower lashline and waterline
Neon accents along the lower lash line and waterline provide a high-impact yet surprisingly simple way to tap into the graphic liner makeup trend. Many creators use neon gel liners or water-activated cake pigments, pressing them close to the roots of the lower lashes for a bold, editorial pop of colour. To avoid irritation, keep strong pigments on the skin side of the lash line and opt for eye-safe pencils if you want to rim the waterline itself. Pairing a neon lower liner with a bare or softly shaded upper lid balances drama with wearability, making it suitable for nightlife or content shoots. If you’re nervous about brightness, start with softer shades like electric teal or lime and build saturation gradually—the camera tends to amplify vibrancy, so less is often more.
Negative space eyeliner designs from alexa demie’s makeup artist
Negative space eyeliner, frequently seen on Alexa Demie and recreated endlessly on TikTok, plays with intentional gaps rather than fully filled shapes. Her makeup artist often outlines a wing or geometric shape but leaves the interior bare or partially transparent, creating a modern, architectural effect. To try this at home, sketch your shape with a fine-tipped liquid liner, ensuring both eyes match before thickening any lines. You can also carve out negative space after the fact by cleaning areas with a pointed cotton bud dipped in micellar water. This style is particularly striking in monochrome looks—pairing black negative space liner with nude lids and bare lashes allows the graphic design to shine without competing elements.
Faux freckle application methods trending on TikTok
The faux freckle trend has evolved from a niche technique into a mainstream staple, especially within “sun-kissed” and “clean girl” makeup aesthetics. TikTok creators have experimented with everything from brow pencils to henna and tan mists to mimic the look of naturally freckled skin. The key to believable faux freckles lies in variation: differences in size, density, and depth keep them from appearing stamped on. Another crucial factor is placement—freckles should mirror where the sun would naturally hit, clustering across the bridge of the nose and upper cheeks. When done well, faux freckles soften the overall makeup look and add a youthful, outdoorsy charm that pairs beautifully with sheer bases and blush-draping trends.
Mikayla nogueira’s dotting technique with brow pencils
Mikayla Nogueira helped popularise a practical, beginner-friendly faux freckle method using standard brow pencils. Her approach involves lightly dotting the skin with a sharpened pencil in varying pressure, then tapping over the marks with fingertips or a damp sponge to diffuse harsh edges. Using a couple of different shades—slightly warmer and cooler brown tones—adds depth and avoids a flat, uniform effect. For the most realistic outcome, apply freckles after foundation but before setting powder so the pigment can meld into the base. If you’ve ever worried about faux freckles looking cartoonish, Mikayla’s blending step is the secret that transforms obvious dots into naturally sun-kissed speckles.
Henna and semi-permanent freckle tattooing alternatives
For longer-lasting results, many TikTok creators have turned to henna-based freckle kits and semi-permanent freckle tattooing. Henna freckles, when formulated specifically for facial use, can last from several days to over a week, offering a low-maintenance option for holidays or festival season. Application usually involves dotting diluted henna on clean skin, allowing it to develop, then gently removing the residue to reveal stain beneath. At the more permanent end of the spectrum, cosmetic tattooists offer freckle tattoos that fade over time, typically lasting one to three years. While the appeal of “wake-up-with-freckles” convenience is clear, it’s essential to research practitioners thoroughly and request healed-result photos, as placement and colour choices are far less forgiving once ink is involved.
Strategic placement mapping for natural sun-kissed effect
Strategic freckle mapping separates convincing faux freckles from obviously drawn-on designs. Professionals often recommend concentrating the highest density across the bridge of the nose and the high points of the cheeks, then scattering a few outwards towards the temples and forehead. Avoid placing too many freckles on the lower half of the face, as this can look less natural and distract from the lifted, youthful focus that most sun-kissed makeup looks aim for. Varying proximity also matters: cluster some freckles in small groups and leave others isolated to mimic the randomness of natural pigmentation. To tie everything together, a light sweep of translucent powder or a fine mist of setting spray over the entire face helps blur the edges and integrate the freckles into the overall complexion.
E-girl aesthetic blush draping and Under-Eye placement
The E-girl aesthetic, born on platforms like TikTok and Twitch, has made dramatic blush draping and under-eye placement a defining feature of modern youth makeup. Instead of confining blush to the apples of the cheeks, creators sweep it high across the cheekbones, over the nose bridge, and sometimes right beneath the eyes. The result is a deliberately exaggerated flush that reads as playful, slightly animated, and extremely camera-friendly. This style resonates with younger audiences because it sits at the intersection of cosplay, anime, and street style, allowing for bold self-expression using accessible products like cream blushes and tints. When balanced with soft lips and minimal contouring, E-girl blush remains surprisingly wearable outside of social media content.
Cream blush diffusion across nose bridge and cheeks
Cream formulas are the hero products behind the seamless, diffused blush seen in E-girl makeup tutorials. Starting with a small amount of product on your fingertips or a stippling brush, you tap blush high on the outer cheekbones and sweep it inward over the bridge of the nose. This creates a continuous band of colour reminiscent of a wind-chilled or sun-flushed complexion. Working in thin layers is essential—you can always build intensity, but removing excess pigment without disturbing your base is far trickier. To keep the look cohesive, many creators echo the same shade on the eyelids and lips, using the blush as a multi-use tint for that trademark monochromatic E-girl finish.
Colour theory for soft pink and peach undertone selection
Understanding basic colour theory makes choosing the right blush shades for the E-girl aesthetic much easier. Soft pinks with blue undertones flatter cooler complexions, while peachy corals and warm rose tones complement warmer skin. Neutral undertones can usually wear a broad spectrum of shades, but mid-toned pinks tend to be the most universally flattering option. Because E-girl blush is applied more broadly—across cheeks, nose, and sometimes under the eyes—selecting hues that harmonise with your natural undertones prevents the look from veering into clownish territory. If you’re uncertain, test potential blushes by dabbing a small amount onto bare skin in daylight; the ones that mimic your natural flush are often the safest bet for heavy placement styles.
James charles’s reverse contouring with blush technique
James Charles helped popularise a reverse contouring approach that uses blush rather than bronzer to sculpt the face. Instead of placing blush only on the apples of the cheeks, he extends it upwards towards the temples and slightly beneath the cheekbone, creating the illusion of lift and structure through colour. This technique swaps the cool-toned shadows of traditional contouring for a warmer, more youthful definition that reads beautifully on camera. To keep everything balanced, James often pairs bold blush with strategic highlighting on the tops of the cheekbones and bridge of the nose. If you’ve struggled with harsh or muddy contour, experimenting with blush-based shaping can offer a softer, trend-forward alternative.
Anime-inspired flushed look from haley kim’s tutorials
Haley Kim’s tutorials frequently reference anime-inspired aesthetics, where characters often sport exaggerated, centralised blush that conveys emotion and innocence. Her approach focuses on concentrating blush on the centre of the face—across the nose and inner cheeks—while keeping the outer perimeter relatively clean. This placement pulls attention towards the eyes and mid-face, giving a doll-like, brightened effect that works especially well with rounded eyeliner and glossy lips. To avoid overwhelming the features, Haley usually chooses translucent, buildable formulas and applies them with soft, fluffy brushes. For anyone drawn to K-beauty and J-beauty trends, her take on the anime flush is a natural extension that feels both whimsical and surprisingly wearable.
Clean girl makeup minimalism from matilda djerf and hailey bieber
The “clean girl” aesthetic, championed by creators like Matilda Djerf and Hailey Bieber, has become a defining minimalist makeup trend on Instagram and TikTok. This look prioritises skincare, sheer coverage, and polished details over bold colours or heavy contouring. Dewy skin, brushed-up brows, subtle definition, and hydrated lips create an effortless impression—like your features, but slightly elevated. What makes this trend so enduring is its practicality: it’s quick to apply, comfortable to wear for long days, and compatible with both office settings and casual weekends. For many, the clean girl style serves as a wearable base that can be dialled up or down by adding a bolder lip or a touch of shimmer.
Skin tint and concealer spot application for no-makeup makeup
At the heart of clean girl makeup is the strategic use of skin tints and spot concealing rather than full-coverage foundations. Influencers often apply a lightweight tint with fingers or a damp sponge, focusing on the central areas of the face where redness and unevenness are most visible. Instead of blanketing the skin, they then go in with a precise concealer brush to target specific blemishes, under-eye darkness, or areas of hyperpigmentation. This approach allows natural skin texture—freckles, moles, and subtle sheen—to remain visible, which reads as more realistic and youthful in person and on camera. If you’re aiming for no-makeup makeup that holds up under high-resolution phone cameras, embracing controlled imperfection is key.
Brow lamination effects using soap brow techniques
Fluffy, lifted brows are a signature element of the clean girl look, and “soap brows” have become a viral, budget-friendly alternative to professional lamination. The technique involves activating a clear bar of soap or solid brow wax with a spritz of water or setting spray, then coating a spoolie and brushing brow hairs upward and slightly outward. Once the product sets, hairs appear thicker and more defined, mimicking the feathery effect of lamination without the commitment. To refine the shape, many creators pinch the top edges of the brows with fingers or a clean spoolie, maintaining lift while softening any overly spiky strands. Paired with minimal filling—using a fine pencil or pen only where gaps exist—soap brows frame the face without overshadowing the rest of the clean girl makeup.
Creamy lip and cheek product multi-use application
Multi-use products align perfectly with the minimalist and sustainable ethos behind clean girl makeup. Cream sticks, pots, and balms that work on lips and cheeks streamline your routine while ensuring colour harmony across the face. A popular technique involves dabbing a rosy or nude cream blush onto the cheeks, then tapping the excess onto the lips and even the bridge of the nose for a cohesive, softly monochromatic look. Because these formulas typically contain nourishing oils and emollients, they contribute to the overall dewy, healthy-skin impression that defines the aesthetic. If you want to build a capsule makeup bag inspired by Matilda Djerf and Hailey Bieber, investing in one or two versatile creams that flatter your undertone is often more impactful than a drawer full of separate products.
Cut crease evolution through Drag-Inspired artistry
The cut crease eyeshadow technique, long perfected within drag communities, has undergone a major evolution thanks to beauty YouTubers and social media creators. Originally designed to exaggerate eye size and expression under harsh stage lighting, the cut crease now appears in subtle daytime versions as well as full-glam iterations. The core concept remains the same: creating a sharp contrast between the lid and crease to sculpt and enlarge the eyes. Social media has made this once-intimidating method more accessible, breaking it down into step-by-step tutorials and adapting it for different eye shapes. Whether you’re aiming for maximalist glam or a soft halo effect, understanding cut crease fundamentals can dramatically expand your eye makeup repertoire.
Patrick starrr’s precision cutting with concealer and brushwork
Patrick Starrr is renowned for his ultra-precise cut crease looks, which rely heavily on careful concealer placement and brush control. After building depth in the crease with matte shadows, he uses a flat synthetic brush and a full-coverage concealer to carve out the lid space, often following a smooth, rounded line that sits slightly above the natural crease. This creates a clean canvas for brighter or metallic shades and ensures the contrast between crease and lid remains sharp even when the eyes are open. For those struggling with symmetry, Patrick often recommends tilting the head back slightly and looking down into a mirror to visualise both lids at once. Setting the concealer with a light dusting of translucent powder before adding shadow can also prevent creasing, especially on oilier lids.
Nikkie tutorials’s halo cut crease construction methods
NikkieTutorials popularised the halo cut crease, a variation that places the brightest or shiniest shadow at the centre of the lid, framed by deeper tones on the inner and outer corners. This technique creates a rounded, spotlight effect that makes the eyes appear larger and more dimensional, particularly in photos and video. To achieve it, Nikkie typically starts by mapping deeper shades at both ends of the eye, blending them softly into the crease, then applying concealer only to the central portion of the lid to “cut” that area. A metallic or shimmering pigment is pressed over the concealer, while the edges are carefully blended into the surrounding darker tones to avoid harsh lines. If you’ve ever felt that full cut creases look too harsh for your features, the halo version offers a softer, more diffused alternative that still delivers drama.
Transition shade blending for seamless dimension creation
Regardless of the specific style, successful cut crease looks depend on well-chosen transition shades and meticulous blending. Transition colours—usually mid-tone neutrals one or two shades deeper than your skin—act like the gradient between your bare lid and the darker crease colours. Social media artists often apply these with a fluffy brush slightly above the natural crease, using windshield-wiper motions to diffuse edges before introducing deeper tones. This gradual build prevents the dreaded “stripe” effect where dark shadow abruptly meets bare skin. For hooded or monolid eyes, placing the transition shade slightly higher than you think you need can make a world of difference, ensuring that dimension is still visible when the eyes are open and looking forward.
Glitter and metallic foil adhesion in cut crease looks
Glitter and metallic foils elevate cut crease makeup into full-on editorial territory, but they require the right base for maximum impact and longevity. Many creators swear by glitter glue or a tacky eye primer applied only where the reflective pigment will sit, ensuring adherence without fallout. Pressing—rather than sweeping—the product onto the lid with a flat brush or fingertip packs on intensity and reduces mess. When working with chunkier glitters, keeping them below the crease line helps protect sensitive eye areas and maintain a clean cut edge. As a finishing touch, some artists run a thin line of liquid liner along the border between glitter and matte shadow, sharpening the division and reinforcing that signature cut crease definition.
Syrup skin finish using liquid illuminators and face oils
The concept of syrup skin—a glossy, almost lacquered complexion—has emerged as a bolder cousin to glass skin, particularly popular on TikTok and in editorial shoots. Unlike the subtle, water-like radiance of glass skin, syrup skin embraces a more overt shine achieved through layering liquid illuminators, face oils, and glossy balms on high points of the face. Creators often start with a dewy base, then tap a small amount of facial oil or glossy highlighter onto the tops of the cheekbones, bridge of the nose, and even the eyelids. The key is controlled placement: too much product everywhere can tip into greasy territory, while targeted shine mimics the effect of light catching a syrup glaze. For real-world wear, pairing this finish with long-wear brow and lip products balances the look so it feels intentional rather than overly slick.
Sunset blush gradient techniques from reese blutstein
Reese Blutstein’s signature sunset blush looks have inspired countless creators to rethink how they layer cheek colour. Instead of sticking to a single shade, she blends multiple tones—from soft peach to vibrant coral and rich berry—to mimic the gradient of a sky at dusk. Application typically starts with the lightest colour closest to the centre of the face, moving to deeper tones towards the temples and hairline. Careful blending with a fluffy brush or damp sponge ensures the transitions between hues are seamless, avoiding patchiness or harsh stripes. This technique pairs beautifully with minimalist eyes and lips, allowing the cheeks to become the focal point and offering a fresh take on monochromatic makeup trends.
Latte makeup monochromatic colour matching across features
Latte makeup, a trend that exploded on TikTok and Instagram, is essentially a refined, monochromatic look built around warm, coffee-inspired tones. Think caramel lids, milk-chocolate liner, beige-nude lips, and softly bronzed cheeks—all drawn from the same warm brown colour family. Creators often achieve this by using the same bronzer or eyeshadow palette across multiple features, sweeping a light wash on the eyes, sculpting the cheeks, and even lightly contouring the nose. This cohesive approach is not only visually pleasing but also simplifies product selection, making it ideal for everyday wear or travel makeup bags. When combined with the skin-first philosophies of glass skin and clean girl trends, latte makeup offers a grounded, wearable way to tap into social media’s most enduring beauty aesthetics.