The world of makeup artistry has witnessed a remarkable renaissance in blush application techniques, transforming this once-simple cheek enhancement into a sophisticated sculptural art form. Statement blush represents far more than traditional colour placement; it embodies a philosophy of facial architecture that harnesses pigment technology, professional application methods, and anatomical precision to create dimensional beauty effects. Modern makeup enthusiasts and professionals alike are rediscovering the transformative power of strategic colour placement, moving beyond basic apple-of-the-cheek application to embrace complex draping methodologies that can reshape facial contours and enhance natural bone structure with remarkable subtlety and impact.
Blush formulation chemistry and pigment technology for statement looks
Understanding the scientific foundation behind high-performance blush formulations reveals why certain products excel in statement applications whilst others fall short of professional expectations. Modern blush chemistry represents a sophisticated balance of pigment concentration, binding agents, and texture modifiers that determine both initial colour payoff and longevity throughout extended wear periods. The molecular structure of contemporary blush formulations incorporates advanced polymer networks that create seamless adhesion to skin whilst maintaining flexibility for natural movement and expression.
Mica-based pigment systems and light reflection properties
Mica particles serve as the cornerstone of premium blush formulations, providing the luminous quality that distinguishes professional-grade products from mass-market alternatives. These naturally occurring silicate minerals create multidimensional colour through their unique crystalline structure, which reflects light at multiple angles to produce depth and radiance. The particle size distribution within mica-based systems directly influences the final aesthetic outcome, with finer particles creating smoother application and more natural integration with skin tone.
Titanium dioxide-coated mica particles offer enhanced opacity and colour intensity, making them particularly valuable for statement looks requiring dramatic impact. The coating process involves precise temperature control and atmospheric conditions that determine the final optical properties of each pigment batch. Professional makeup artists often select blush formulations with specific mica content ratios to achieve targeted effects, understanding that higher mica concentrations produce more reflective finishes suitable for photography and stage applications.
Pressed powder matrix engineering for High-Impact colour payoff
The pressing technique employed during blush manufacturing significantly affects both texture and colour release characteristics. Cold-pressing methodologies preserve pigment integrity whilst creating optimal particle distribution throughout the compact matrix. This manufacturing approach prevents colour migration and ensures consistent performance across the entire product surface, eliminating the common issue of uneven pigmentation that can compromise statement looks.
Binding agents such as magnesium stearate and zinc stearate create the structural foundation that holds pigment particles together whilst allowing controlled release during application. The ratio of these binding agents determines whether a blush formulation will provide sheer buildability or intense initial impact. Professional-grade formulations often incorporate multiple binding systems to achieve complex release profiles that accommodate both subtle everyday wear and dramatic statement applications within the same product.
Iron oxide blends versus synthetic dye integration techniques
The choice between iron oxide-based pigmentation and synthetic dye systems fundamentally shapes the character and performance of blush formulations. Iron oxides offer superior longevity and fade-resistance, making them ideal for statement looks requiring all-day wear without touch-ups. These mineral-based colorants provide rich, saturated tones that maintain their vibrancy under various lighting conditions, from natural daylight to artificial indoor illumination.
Synthetic dyes, whilst offering broader colour possibilities and often more vibrant initial impact, may exhibit different interaction patterns with skin chemistry. Lake pigments, created by precipitating water-soluble dyes onto inert substrates, combine the intensity of synthetic colorants with improved stability characteristics. The integration of these pigment types requires careful consideration of pH compatibility and potential interaction with other formulation components.
Buildable formula architecture for gradient intensity control
Professional statement blush techniques demand formulations that respond predictably to layering applications, allowing artists to create seamless colour gradients from subtle enhancement to dramatic impact. Buildable architecture relies on specific particle size distributions and binding agent ratios that enable successive applications without creating muddy or patchy results. The key lies in formulating products that maintain their colour clarity and blend
clarity even when layered over liquid or cream bases. In practice, this means you can apply multiple passes of blush to build a bold sculptural effect while still maintaining a translucent, skin-like finish rather than an opaque mask. For statement blush looks and blush draping, such buildable formulas make it easy to shift from a daytime flush to an evening editorial finish simply by adjusting the number of layers and the pressure of your brush.
Film-forming polymers and volatile silicones also contribute to gradient intensity control by allowing each layer to set before the next is applied. This stacking effect creates a subtle “veil on veil” architecture, where colour is suspended in ultra-thin strata rather than concentrated in a single heavy deposit. The result is controlled saturation that you can fade at the edges with minimal effort, crucial when sculpting blush across the cheekbones, temples, and even into the eye area for cohesive draping effects. When shopping for a statement blush, phrases such as sheer-buildable, soft-focus finish, and layerable pigment are useful indicators that the formula has been engineered with gradient control in mind.
Professional brush selection and application tools for sculptural blush techniques
Even the most advanced blush formulation cannot reach its full potential without the right tools. Brush architecture, fibre composition, and density all influence how pigment is picked up, dispersed, and blended across the skin. For statement blush looks in particular, tool choice becomes a strategic decision: the same colour can read whisper-soft or intensely sculpted depending on whether you use an angled contour brush, a dense stippling brush, or a duo-fibre blender. Understanding how different tools interact with both powder and cream formulations empowers you to translate any blush concept—from subtle monochrome draping to graphic under-eye blush—into a controlled, repeatable technique.
Angled contour brushes versus stippling brush density considerations
Angled contour brushes are designed to echo the natural slope of the cheekbone, making them ideal for blush draping that follows facial architecture. Their slanted edge allows you to place product precisely beneath the cheekbone and sweep upward toward the temple in a single motion, creating a lifted, sculptural effect. Because most angled brushes are moderately dense, they tend to deliver medium to high colour payoff, which is useful when you want a bold statement blush with clear structure.
Stippling brushes, by contrast, rely on a varied fibre length and looser density to create an airbrushed finish. When you tap pigment onto the skin with a stippling motion, you distribute micro-dots of colour that can be built up gradually without harsh demarcation lines. This makes stippling tools particularly valuable for beginners or for working with highly pigmented formulas where over-application is a risk. If you have ever wondered why your blush looks patchy or heavy on one side, switching to a less dense stippling brush can immediately improve distribution and blending, giving you more confidence to experiment with sculptural placement.
Natural bristle taklon synthetic hybrid performance analysis
Brush fibre technology has evolved rapidly over the past decade, with Taklon and other advanced synthetics now competing directly with natural hair in terms of performance. Natural bristles, traditionally sourced from goat or pony hair, have cuticle structures that grip powder particles effectively, making them excellent for diffusing pressed or loose blush. They tend to create a soft-focus, blurred edge that flatters textured or mature skin, especially when executing wide draping techniques across the cheeks and temples.
Synthetic fibres, including Taklon, are smoother and less porous, which means they absorb less product and release more pigment directly onto the skin. For cream and liquid blush, this is a distinct advantage, as synthetic brushes do not swell or degrade in contact with emollients and oils. Hybrid brushes that combine natural and synthetic fibres aim to offer the best of both worlds: the powder-gripping ability of natural hair with the resilience and easy-clean properties of synthetics. For high-impact blush sculpting where hygiene, precision, and pigment efficiency are paramount, these hybrid tools can be a strategic investment in your kit.
Brush size calibration for cheekbone mapping and placement precision
Brush size directly determines how much control you have over your blush placement. Large, fluffy brushes are excellent for diffusing a soft wash of colour over a broad area, but they can easily overwhelm smaller faces or finer bone structures. When you are mapping cheekbones for statement blush draping, a medium-sized brush with a slightly tapered or rounded head often strikes the best balance between coverage and precision. You can use the tip for targeted placement and the sides for gentle diffusion, all without switching tools.
Smaller detail brushes—such as mini contour brushes or precision highlighter brushes—are invaluable for under-eye draping and for blending blush into the temple and brow bone area. Think of them as your “detail sculpting chisels,” allowing you to refine the edges of your colour architecture much like a sculptor refines stone. If you find that your blush regularly migrates too close to the nose or too far onto the jawline, scaling down your brush size is a simple yet effective way to tighten your placement map and create a more editorial, intentional finish.
Duo-fibre technology applications in blended statement finishes
Duo-fibre brushes, easily recognised by their two-tone bristle construction, combine longer synthetic fibres with a base of shorter natural or synthetic hairs. This configuration creates a diffused pickup zone where only the tips of the longer fibres make initial contact with the product. The result is a light, controlled pigment load that you can build in sheer layers—ideal for creating ombré blush gradients and seamless transitions between cheek colour, bronzer, and highlighter.
For sculptural blush looks that rely on a gradient from intense colour near the high point of the cheekbone to a soft haze toward the hairline, duo-fibre brushes behave almost like a built-in blending tool. They are particularly effective with bold or unconventional shades, such as berry, plum, or terracotta, that can look intimidating in the pan but translate beautifully when diffused. If you are experimenting with monochromatic blush draping that extends onto the eyelids, a smaller duo-fibre eye brush can mirror this effect in the orbital area, tying the entire look together with consistent softness.
Anatomical face mapping and bone structure analysis for strategic placement
Statement blush becomes truly transformative when it respects the underlying architecture of the face. Rather than treating the cheek as a flat canvas, professional artists analyse the zygomatic bone (cheekbone), temporal area, orbital rim, and jawline to determine optimal colour pathways. You can think of this process as creating a topographical map, where areas of natural prominence catch more light and can handle higher saturation, while recessed zones benefit from softer diffusion to maintain balance.
To start anatomical face mapping at home, gently run your fingers along your face to locate the highest point of your cheekbones, the hollow beneath them, and the intersection where your cheekbone meets the temple. On most faces, a line drawn from the outer corner of the mouth to the top of the ear will mark the general slope of the cheekbone. Placing the most intense portion of your blush just above this line, then blending upward and outward, creates a lifted effect that mimics the visual result of subtle contouring without the need for grey or taupe tones. For round or square faces, extending colour slightly higher and closer to the outer eye elongates the face, while heart and diamond shapes often benefit from more centralised placement to add softness and balance.
When executing advanced blush draping, consider how colour interacts with the orbital bone around the eye. A soft halo of blush that connects the outer cheek to the temple and subtly brushes the lower brow bone can visually tie the upper and lower face together, creating harmony and cohesion. However, it is essential to maintain a gradient: the closer you get to the thin skin under the eye, the more transparent and finely milled your blush should be to avoid emphasising texture. By treating your blush placement as a three-dimensional design rather than a two-dimensional stripe, you can sculpt with colour in a way that feels modern, flattering, and tailored to your unique bone structure.
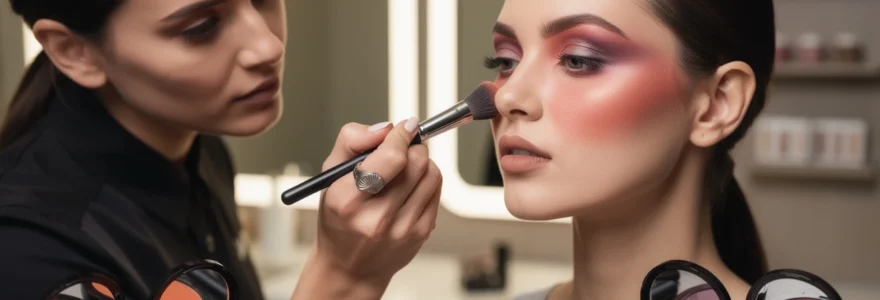
Advanced blending techniques using stippling and buffing methodologies
Once placement is mapped, blending becomes the defining factor between a professional statement blush and a patchy, uneven result. Stippling and buffing are two complementary methodologies that, when used together, deliver a polished, editorial finish. Stippling refers to tapping pigment onto the skin in small, repeated motions, much like dotting paint with the tip of a brush. This method is particularly effective as a first step with bold pigments because it allows you to build opacity slowly and maintain control over the edges of your colour.
Buffing, on the other hand, uses small circular or back-and-forth motions to merge the blush into the surrounding base products and skin. Think of stippling as placing the colour and buffing as melting it into the complexion. For high-impact blush sculpting, you might stipple the majority of your product at the high point of the cheekbone, then switch to gentle buffing strokes to pull the colour toward the temple and slightly onto the apple of the cheek. This two-phase approach guards against harsh lines while preserving the intentional shape of your drape.
To refine your blending further, work with pressure control: use a lighter hand as you move away from the central colour deposit, allowing the brush to barely skim the skin’s surface. If you notice a visible edge, you can introduce a clean, fluffy brush dedicated solely to blending with no additional product. This “eraser brush” acts like a soft-focus filter, diffusing any harsh transitions without adding more pigment. For cream or liquid blush, a damp makeup sponge tapped over the edges will perform a similar function, creating that sought-after “second-skin” finish that is essential for modern statement blush looks.
Colour theory applications in blush selection for skin undertone matching
Effective statement blush is as much about colour strategy as it is about placement and blending. Colour theory gives you a framework to choose shades that harmonise with your undertone while still offering contrast and visual interest. When blush draping spans the cheeks, temples, and occasionally the eyes, undertone mismatches become far more noticeable, which is why strategic shade selection is crucial for bold looks. By aligning your blush with the natural temperature and depth of your skin, you can wear saturated berry, coral, or terracotta tones without the colour overpowering your features.
Undertones fall broadly into four categories: cool, warm, neutral, and olive. Cool undertones show more pink, red, or blue in the skin; warm undertones lean golden or peach; neutral sits between the two; and olive combines golden warmth with a subtle green cast. One simple test is to compare how your skin looks against pure white versus off-white fabric, and to note whether silver or gold jewellery feels more harmonious. Once you understand where you sit on this spectrum, you can approach blush selection with the same precision a colourist brings to hair or a stylist brings to wardrobe, using hue, saturation, and value (lightness or darkness) to complement and sculpt your complexion.
Cool undertone compatibility with berry and plum pigment families
Cool undertones naturally harmonise with blush shades that contain blue or red bases, such as raspberry, fuchsia, berry, and plum. These pigment families echo the inherent rosiness in cool skin, creating a cohesive, lit-from-within effect even when the colour is bold. For fair cool skin, sheer berry stains and soft cool pinks offer a fresh, youthful statement blush that can be built up along the cheekbones and diffused toward the temples without looking stark.
Medium to deep cool complexions can embrace richer plums, wine tones, and even cranberry shades for sculptural draping. When extended onto the temple and outer eye area, these hues create a sophisticated, editorial vibe reminiscent of runway looks, yet remain flattering because they mirror the underlying temperature of the skin. If you worry that berry blush might look too dramatic, focus the most intense pigment away from the centre of the face and blend inward softly; this keeps the look modern and refined rather than theatrical.
Warm undertone enhancement through coral and peach formulations
Warm undertones thrive on the energy of coral, peach, apricot, and warm rose blushes. These shades resonate with the golden and yellow notes in the skin, producing a sun-kissed effect that is especially effective in summer statement blush trends. A soft peach draped from the high points of the cheek down onto the apples can mimic the way skin naturally flushes after heat or exertion, making even a strong application feel believable.
For deeper warm complexions, rich tangerine, amber, and terracotta-leaning peach tones create stunning sculptural depth. When blended upward along the cheekbone and slightly onto the temple, these shades can double as both blush and bronzer, simplifying your routine while maintaining dimension. To keep coral and peach formulations from appearing too orange on light warm skins, choose products described as “soft peach,” “warm nude,” or “rose-coral,” which typically include a hint of pink to balance the warmth and maintain a natural finish.
Neutral undertone versatility with mauve and dusty rose selections
Neutral undertones sit comfortably between warm and cool, giving you more freedom to experiment with a broad range of blush colours. Mauve, dusty rose, and beige-rose tones are particularly flattering, as they balance pink, brown, and occasionally plum notes in a way that feels sophisticated and understated. These shades are ideal if you want a statement blush that reads polished rather than overtly dramatic, especially in professional or daytime settings.
Because neutral skin can accommodate both warmer and cooler blush families, you can tailor your choice to the rest of your makeup. Pair mauve or cool rose with cool-toned eye looks and lip colours, or reach for warm nude and soft terracotta blush when wearing bronze or gold on the eyes. For blush draping, a neutral dusty rose swept along the cheekbones and softly into the crease of the eye creates a chic monochromatic look that feels intentional yet wearable, proving that statement colour does not always need to be vivid to be impactful.
Olive skin complementary shades including terracotta and burnt orange
Olive complexions, with their unique combination of golden warmth and subtle green undertones, often struggle with traditional pink blushes that can sit unnaturally on the skin. Instead, terracotta, burnt orange, brick rose, and warm cinnamon shades tend to melt seamlessly into olive tones, enhancing the complexion’s natural depth. These hues echo the earthy richness found in the skin, making them ideal candidates for sculptural statement blush looks.
For light-to-medium olive skin, soft terracotta and muted coral-browns offer enough contrast to define the cheekbones without pulling too red. Deeper olive tones can embrace bolder brick, russet, and even copper-infused blushes, which double beautifully as eyeshadow when draped into the crease and outer corner. If you are exploring blush draping for the first time on olive skin, start with a sheer terracotta formula and build gradually along the cheekbone; you will often find that the colour appears more natural than expected once blended, yet delivers striking dimension.
Professional setting techniques and longevity enhancement methods
Bold blush sculpting and draping rely on longevity to maintain their impact throughout the day or night. Without proper setting techniques, even the most meticulously blended statement blush can fade unevenly, leaving patchy colour or muddied edges. Professional artists approach wear time as a multi-step process, beginning with skin preparation and ending with strategic setting and touch-up planning. The goal is not to lock the face into immobility but to create a flexible, breathable colour layer that resists transfer and breakdown.
For powder blush, pressing the product into the skin rather than sweeping it across the surface enhances adhesion and reduces fallout. After application, a light veil of finely milled translucent powder can be dusted over the draped areas with a soft brush to gently “mesh” the blush with the underlying base. With cream or liquid formulas, setting can be achieved by layering a coordinated powder blush on top—this cream-and-powder sandwich structure dramatically increases longevity while preserving a multidimensional finish. If you prefer a dewy look, concentrate any setting powder on the outer edges of your blush drape, leaving the centre slightly more luminous to maintain a skin-like sheen.
Setting sprays play a crucial role in locking in statement blush looks, especially for events, photography, or long days. Hold the spray at least 20–25 cm from your face and mist in an “X” and “T” pattern, allowing the micro-droplets to settle without disturbing your work. Some artists also favour the “buffing with spray” technique: lightly mist a clean, dense brush with setting spray, then use soft circular motions over the blush area to meld all layers together. Finally, consider carrying a small, travel-sized cream blush or compact for subtle touch-ups; because your placement and blending have already been carefully mapped, a minimal amount of product tapped into any faded zones will restore the original statement effect without requiring a full reapplication.