Eyebrows have evolved from an afterthought in beauty routines to one of the most defining features of facial aesthetics. Well-shaped, perfectly groomed eyebrows can transform your entire appearance, creating symmetry, enhancing your natural features, and drawing attention to your eyes. The difference between sparse, neglected brows and beautifully defined arches can be the equivalent of years off your appearance and a significant boost to your overall confidence. Whether you’re blessed with naturally thick brows or working with sparse growth, understanding the principles of eyebrow architecture and implementing professional shaping techniques can help you achieve that coveted, polished look that perfectly frames your face.
The journey to impeccable eyebrows begins with understanding your unique facial structure and bone architecture. Unlike one-size-fits-all beauty trends that come and go, your ideal eyebrow shape is deeply personal, determined by your face shape, bone structure, and individual features. The secret lies not in following fleeting trends, but in mastering the art of brow mapping and strategic shaping that works harmoniously with your natural attributes.
Understanding your natural eyebrow architecture and bone structure
Before reaching for tweezers or booking a professional appointment, you need to understand the fundamental architecture of your eyebrow area. Your orbital rim and brow bone prominence play crucial roles in determining where your eyebrows should naturally sit and how they should be shaped. This foundational knowledge separates haphazard plucking from strategic, flattering eyebrow design.
Identifying your orbital rim and brow bone prominence
The orbital rim is the bony structure that surrounds your eye socket, and your brow bone sits just above this structure. To identify your natural brow bone prominence, gently press your fingers along your eyebrow area, moving from the inner corner outward. You’ll feel the bone structure beneath the skin and muscle. Some individuals have very pronounced brow bones, creating natural definition and shadow, whilst others have flatter bone structure that requires more strategic hair placement and makeup application to create dimension. Understanding this aspect of your facial anatomy helps you work with your natural structure rather than against it, ensuring your eyebrows enhance rather than fight your bone structure.
Assessing your natural eyebrow hair growth pattern and density
Your natural hair growth pattern is as unique as your fingerprint. Some people have hair that grows uniformly upward, whilst others experience hair that grows in multiple directions, creating challenges for styling and definition. Take time to observe your eyebrows in natural lighting without any products. Notice where your hair is densest, where gaps appear, and which direction the hairs naturally fall. This assessment is critical because attempting to create a shape that contradicts your natural growth pattern will result in constant maintenance struggles and potentially unnatural-looking results. If you have particularly unruly or multi-directional growth, you might benefit from techniques like eyebrow lamination, which we’ll explore later.
Determining your ideal eyebrow shape based on face morphology
The golden rule of eyebrow shaping involves choosing a shape that contrasts with your face shape, creating balance and harmony. Round faces benefit from angular, high-arched brows that add vertical dimension and create the illusion of length. Square faces, characterised by strong jawlines and broad foreheads, are softened by curved, S-shaped brows that introduce gentleness to angular features. Long or rectangular faces require flatter, elongated brows with subtle arches to add horizontal elements and visual width. Heart-shaped faces, wider at the forehead and narrower at the chin, achieve balance with soft, rounded arches and fuller brows. Oval faces enjoy the most versatility, able to carry various shapes successfully, though soft-angled brows tend to complement the natural balance of oval structures beautifully.
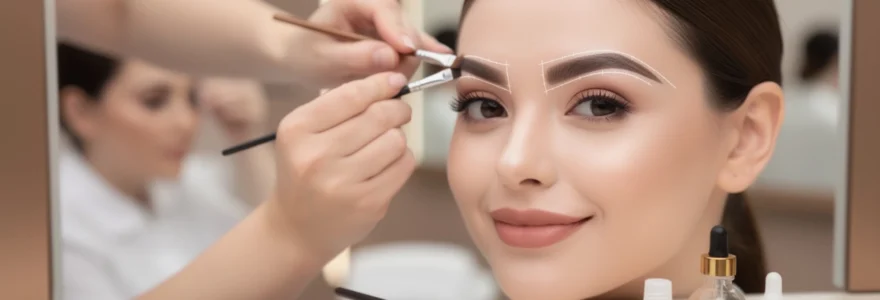
Measuring the golden ratio: mapping start point, arch apex, and tail end
Professional eyebrow mapping relies on precise measurements based on your facial landmarks. The start point of your eyebrow should align with the bridge of your nose, slightly past the inner corner of your eye when holding a pencil or brush vertically against the side of your nostril. The arch apex,
or highest point of your brow, is typically found by angling that same pencil from the outer edge of your nostril through the centre of your pupil while looking straight ahead. Finally, the tail end of the eyebrow is mapped by placing the pencil from the side of the nostril to the outer corner of your eye; this is where your brow should ideally finish, with the tail sitting level with or slightly higher than the start point. This three-point mapping system is loosely based on the golden ratio and helps you create eyebrows that feel balanced and proportionate to your unique features. Use a fine brow pencil or white mapping pencil to lightly mark these three points before you begin shaping so that every hair you remove or define is working towards a deliberate, harmonious outline rather than guesswork.
Professional eyebrow shaping techniques and methods
Once you understand your natural eyebrow architecture, the next step is choosing the right professional eyebrow shaping technique. Each method offers different levels of precision, longevity and comfort, so the best choice depends on your skin type, brow density and maintenance preferences. Many people combine methods over time – for example, threading for shaping, tinting for colour and lamination for lift – to achieve truly well defined eyebrows that frame the face perfectly. Let’s break down the main professional options so you can decide which one suits your brow goals and lifestyle.
Threading vs tweezing: precision hair removal for clean lines
Threading and tweezing are two of the most popular techniques for achieving clean, crisp brow lines without removing too much bulk. Threading uses a loop of twisted cotton thread to trap and lift multiple hairs from the follicle in a single pass, making it ideal if you have dense growth or want ultra-precise borders along the top and bottom of the brow. Tweezing, on the other hand, removes hairs one by one with a slanted or pointed tweezer, giving you meticulous control that works well for maintenance between appointments or for refining the brow outline after waxing or threading. If you have sensitive skin or use active skincare ingredients like retinoids and acids, tweezing is often gentler because it doesn’t disturb a large area of skin at once.
Wondering which method gives the sharpest shape? Threading typically delivers the cleanest, straightest lines because the thread moves in a smooth, continuous motion, almost like a fine razor for hair. However, threading can feel more intense for first-timers, especially along the upper brow and between the brows, whereas tweezing distributes the sensation over time. A useful strategy is to let a professional brow artist perform the initial shaping with threading, then use tweezers at home only to remove obvious stray hairs that sit well outside your mapped eyebrow shape. This approach protects the integrity of your brow design while keeping maintenance simple and affordable.
Microblading and nanoblading for Semi-Permanent definition
If you struggle with sparse areas, gaps from past over-plucking or naturally light hair, microblading and nanoblading can offer a semi-permanent solution. Microblading uses a manual hand tool with very fine blades to create hair-like strokes that deposit pigment into the upper dermal layer of the skin, mimicking natural brow hair. Nanoblading is a more advanced version that employs even finer needles, allowing for more delicate lines and a softer, hyper-realistic effect, which is especially beneficial if you have thin, fine or mature skin. Both techniques are designed to enhance your existing brow shape rather than create a completely new one, so thorough consultation and brow mapping beforehand are essential.
Results typically last 12–24 months depending on your skin type, lifestyle and how strictly you follow aftercare instructions such as avoiding sun exposure and exfoliating acids on the area. If you’re nervous about committing, think of microblading like a subtle, long-wear brow pencil that slowly fades rather than sudden, tattoo-like blocks of colour; modern techniques focus on featherlight, strategic strokes rather than heavy shading. Always choose a certified, experienced technician who specialises in eyebrows and can show you a portfolio of healed results, not just immediately after-treatment photos. This investment can drastically cut down daily makeup time, especially if you want well defined eyebrows that stay put through workouts, humidity and long workdays.
Eyebrow lamination treatment for fuller, lifted appearance
Eyebrow lamination has surged in popularity because it offers an instant “brow lift” effect without needles or pigment. The treatment uses a gentle chemical solution to temporarily relax the brow hairs so they can be brushed into a new direction, usually upwards and outwards, then fixed into place. This makes each hair appear longer and fuller, filling in small gaps and creating a fluffy, editorial finish that still looks natural when done well. For anyone with downward-growing, coarse or unruly brows, lamination can be transformative, giving the illusion of thicker, more structured arches with minimal daily effort.
The lamination effect typically lasts 4–8 weeks, aligning with your natural hair growth cycle. During this time, you’ll likely find that you need far less product to achieve definition, as the hairs already sit in a lifted, groomed position. To maintain brow health, it’s crucial to follow aftercare guidelines, such as avoiding water and steam for the first 24 hours and regularly conditioning the brows with a nourishing oil or serum. Think of lamination as a keratin blow-dry for your brows: it rearranges what you already have rather than adding something new, making it a fantastic option if you want bolder definition without permanent changes.
Trimming and scissor techniques for unruly hair management
Even the best-shaped brows can look messy if individual hairs are too long or stick out in different directions. Strategic trimming with fine, curved eyebrow scissors helps refine the silhouette without making the brows sparse. The key is to brush the brow hairs upward with a spoolie and only trim the very tips that extend well beyond your mapped outline, cutting with a “feathering” motion rather than a blunt, horizontal line. This preserves the natural texture and density of the brow, avoiding the harsh, “chopped” look that can make eyebrows appear patchy.
If your brows are particularly thick or bushy, resist the urge to over-trim; cutting too much can create unwanted gaps and make the brows harder to control. Instead, combine light trimming with a strong-hold clear brow gel or wax to coax the hairs into place. Many professionals also trim from the top of the brow very sparingly, only where hairs excessively disrupt the chosen shape, and focus the majority of removal underneath for lift. This subtle management of length can be the difference between brows that look wild and brows that look intentionally full and well defined.
Creating symmetry through strategic brow mapping
Very few faces are perfectly symmetrical, yet well defined eyebrows can create the illusion of symmetry and balance. Brow mapping is the process of using precise reference points on your face to design a shape that suits your features while aligning both brows as closely as possible. Think of it like drafting a blueprint before building a house; once the blueprint is accurate, every hair you pluck or pencil stroke you add supports the final structure. By following a consistent mapping method, you reduce the risk of over-plucking, uneven arches and tails that end too short or too low.
Using the anastasia beverly hills brow mapping method
The Anastasia Beverly Hills brow mapping method is one of the most widely respected systems for creating balanced, flattering brows. It builds on the basic three-point technique but adds more nuance, taking into account the width of the nose, the distance between the eyes and the overall proportions of the face. You begin by marking the brow start, arch and tail using a thin brush or pencil aligned with specific facial landmarks, as described earlier. Then additional markers are added along the lower and upper edges of the brow to outline the ideal thickness and curve, essentially creating a dotted framework you can follow during shaping and filling.
To try this at home, sit in front of a mirror in natural light and make small, light marks rather than heavy lines so they’re easy to adjust. Step back periodically to see your entire face rather than focusing on one brow at a time; this helps you detect subtle differences in height, length or thickness before they become obvious. While it can feel technical at first, after a few sessions the process becomes almost intuitive, and you’ll start to see how small adjustments in the arch apex or tail length can dramatically change how lifted or soft your expression appears. This method is particularly useful if you want consistently well defined eyebrows that still look uniquely yours rather than copied from a template.
Adjusting for facial asymmetry and corrective shaping
Most of us have one brow that sits slightly higher, is naturally fuller or has a different growth pattern than the other – and that’s completely normal. The goal of corrective shaping isn’t to force perfect symmetry, but to create a harmonious “family resemblance” between the two brows. To do this, identify which brow you prefer (often the fuller or higher one) and use that as your reference, making soft corrections to the other side. For example, you might slightly raise the arch of the lower brow with careful tweezing beneath the arch, or gently extend the tail of the shorter brow using a brow pencil or microblading strokes.
It’s tempting to keep “fixing” both brows until they match exactly, but this often leads to over-plucking and brows that are much thinner than you intended. Instead, work in stages: remove a few hairs, check the overall balance, and fill in any differences with makeup rather than hair removal. Remember that brows are sisters, not twins – a helpful mantra when you’re tempted to chase perfection. If your facial asymmetry is more pronounced, such as a noticeably higher brow due to muscle activity or past injury, consulting a professional brow artist or aesthetic practitioner can provide tailored strategies, from advanced mapping to subtle Botox lifting, to even out the appearance.
Application of the Three-Point measurement technique
The three-point measurement technique is the simplest way to bring structure and consistency to your eyebrow shaping routine. First, map the starting point of each brow by placing a straight tool – such as a makeup brush – vertically from the outer edge of your nostril up to your brow; this keeps the brows from starting too far apart or too close together. Second, angle the tool from the nostril through the centre of your pupil to find the highest point of your arch, ensuring that both arches sit at proportionate positions relative to your eyes. Third, angle the tool from the nostril to the outer corner of the eye to determine where the tail should end, preventing tails that droop too low and drag the eyes downward.
Once these three points are lightly marked on both brows, connect them with soft guideline strokes along the upper and lower borders to visualise the full shape before removing any hair. This is where many people have an “aha” moment, seeing how just a few millimetres difference in the tail or arch placement can dramatically shift how their face looks. If you’re unsure, take a photo straight on and flip it horizontally on your phone; this mirrored view can reveal imbalances your eyes may have adjusted to. Over time, applying this technique becomes second nature, giving you a reliable framework for keeping your eyebrows looking defined and polished, even when you’re doing quick maintenance at home.
Filling and defining sparse eyebrows with cosmetic products
Even with excellent shaping, most of us rely on cosmetic products to create that polished, well defined eyebrow look we see in editorial shoots and red carpet photos. The right products can mimic natural hairs, subtly enhance colour and add dimension, while the wrong formula or shade can make brows look blocky or artificial. The key is choosing textures and tools that complement your natural brow density and desired finish – from soft powders for diffused definition to precision pencils and pomades for bolder, more sculpted arches. Let’s explore how each product category works and how you can combine them for maximum impact.
Powder-based products: MAC eye brow stylish and benefit foolproof
Powder-based eyebrow products are ideal if you’re aiming for a soft, natural finish that enhances fullness without harsh lines. Formulas like MAC’s brow powders or Benefit’s Foolproof Brow Powder adhere to both skin and hair, lightly shading sparse areas while preserving the natural texture of the brow. Think of brow powder as the “soft-focus filter” of eyebrow makeup: it diffuses edges, fills gaps and is very forgiving if you’re a beginner. For the most realistic effect, choose a shade that matches your natural brow colour or is one tone lighter if you have very dark hair, and apply with a small, angled brush using short, feathery strokes.
To keep powder from looking flat, concentrate the majority of product in the mid-brow and tail, where you typically want more definition, and use only the residue on the brush to soften the inner corners. This gradient effect – lighter at the front, deeper at the tail – mimics the way natural brows are denser towards the arch and tail. If you have oily skin, applying a tiny amount of translucent powder or a matte eyeshadow base under the brow first can help your powder last all day. When combined with a clear or tinted setting gel, powder-based brows can look effortless yet refined, perfect for everyday wear.
Precision pencils: anastasia brow wiz and NYX micro brow pencil
Precision eyebrow pencils, such as Anastasia Beverly Hills Brow Wiz or the NYX Micro Brow Pencil, are indispensable tools for creating hair-like strokes and crisp definition. Their ultra-fine tips allow you to sketch in individual hairs in the direction of your natural growth pattern, making them ideal for sparse brows, patchy areas or extending a short tail. If you’ve ever wondered how makeup artists achieve those incredibly realistic, feathery brows, a fine-tipped pencil is often the secret. The trick is to use a light hand, building colour gradually rather than pressing hard, which can create harsh, waxy lines.
Start by outlining the lower edge of your brow very softly from the mid-brow to the tail, then add small strokes upward and outward to fill in gaps. Avoid creating a strong, blocky front; instead, mimic baby hairs at the start of the brow by drawing tiny vertical strokes and then blending with a spoolie. Many modern pencils are formulated to be slightly waxy for better adherence, so they also help tame stray hairs as you work. Used alone or over a light base of powder, precision pencils give you surgical control over your shape, making it easier to correct asymmetry and achieve truly well defined eyebrows that still look believable up close.
Pomade application techniques for bold, sculpted brows
Brow pomades are cream or gel-based products that offer the most intense colour payoff and structure, perfect if you love a bold, sculpted brow or need long-wear definition that stands up to heat and humidity. Applied with an angled brush, pomade can create crisp lines along the lower edge of the brow and fill in large sparse areas quickly. However, because it’s so pigmented, it’s also the easiest product to overdo. The key is to use the tiniest amount – often just what’s left on the lid – and build up gradually, focusing on the mid-brow and tail while keeping the inner third soft and diffused.
To prevent the dreaded “sharpie brow” effect, always start your brush strokes at the arch or tail and work backward towards the centre, where you want the most depth, then use whatever is left on the brush to lightly touch the front. Blending is non-negotiable: a clean spoolie brushed through the brows after application will soften harsh edges and redistribute product for a more natural gradient. If you’re new to pomade, consider combining it with pencil or powder, using pomade only to define the tail and base, and a softer product to fill the body of the brow. This layered approach gives you definition and drama without sacrificing realism.
Brow gels and setting products for All-Day hold
Brow gels and setting products are the finishing touch that lock your hard work in place and add texture, shine or tint. Clear brow gels are perfect if you already have good density or have filled your brows with powder or pencil and simply want to hold the hairs in position. Tinted gels, often containing tiny fibres, can both colour and slightly volumise the brows, making them a quick, one-step solution on minimal makeup days. To keep brow hairs lifted and groomed all day, choose a gel with strong hold and apply in upward and outward motions, following your chosen shape.
For the popular “soap brow” or laminated effect at home, some people use wax-based products or brow soaps to achieve extra lift and structure. Think of these as styling products for your brows in the same way hairspray supports a hairstyle. When layering gel over other products, allow your pencil or powder to set for a minute first to avoid smudging, and use a light touch to avoid clumping. With the right setting product, your brows will look freshly groomed from morning to night, which is essential if you want consistently well defined eyebrows that stand up to daily wear.
Advanced maintenance and growth enhancement strategies
Achieving your ideal brow shape is only half the journey; maintaining healthy hair growth and preventing damage are crucial for long-term results. Brows, like the hair on your head, go through growth and shedding cycles, and factors such as stress, hormonal changes, over-plucking and aggressive skincare can all affect fullness. An advanced brow routine focuses on nurturing the follicles, minimising trauma and using professional treatments strategically to enhance what you already have. If you’ve ever wished your brows would grow thicker or faster, this is where science and skincare step in to support your goals.
Castor oil and peptide serums for hair follicle stimulation
Castor oil has long been a popular home remedy for encouraging eyebrow growth thanks to its rich content of ricinoleic acid and fatty acids that help condition hair and surrounding skin. While research on its direct impact on hair growth is limited, many people find that regular application improves the appearance of thickness and sheen, likely because well-moisturised hairs break less and look fuller. To use it safely, apply a small amount to clean brows at night with a disposable spoolie or cotton swab, taking care not to get it into your eyes, and cleanse the area in the morning.
For more targeted results, peptide-based brow serums backed by cosmetic science can be highly effective. These formulas often include ingredients such as biotin, panthenol, amino acids and patented peptide complexes designed to support the hair growth cycle and strengthen follicles. Clinical studies from several major brands show visible improvement in brow density and length within 8–12 weeks of consistent use. As with any active cosmetic, patch test first and follow the manufacturer’s guidelines, especially if you have sensitive skin or a history of eye irritation. Combined with gentle grooming habits, serums can significantly accelerate your journey towards fuller, well defined eyebrows without resorting to more invasive procedures.
Avoiding Over-Plucking and restoring damaged hair follicles
One of the most common obstacles to achieving ideal brows is a history of over-plucking, especially from trends of ultra-thin brows in past decades. Chronic removal of hairs from the same area can damage follicles, leading to reduced growth or, in some cases, permanent loss. The first step in restoring over-plucked brows is a “tweezer detox”: commit to not removing any hairs within your mapped brow shape for at least 8–12 weeks, even if the regrowth looks messy. During this time, use concealer and brow products to camouflage stray hairs instead of pulling them, allowing your follicles to recover.
If some areas never fully grow back, don’t lose hope; a combination of strategies can still create the appearance of thicker brows. Growth serums, microblading or nanoblading, and strategic makeup techniques can all help rebuild your ideal shape. For stubborn bald patches, consult a dermatologist or trichologist to rule out underlying conditions such as alopecia areata or thyroid imbalance. In severe cases, procedures like eyebrow hair transplants are available, though they are more invasive and costly. The key takeaway? Think of each hair as valuable real estate – remove only what sits outside your carefully mapped shape, and give your brows time and support to regenerate.
Professional tinting services for enhanced colour depth
Professional eyebrow tinting is a powerful yet often underrated tool for making brows look fuller and more defined with minimal daily effort. Using semi-permanent dye tailored to your hair and skin tone, a brow technician can deepen the colour of light hairs – including barely visible vellus hairs – which instantly increases the perceived density of your brows. This is particularly effective if you have naturally fair brows, grey hairs starting to appear, or simply want to reduce the amount of product you use each morning. Tinting results typically last 3–6 weeks, gradually fading as the hairs shed and grow.
To keep the effect flattering rather than harsh, professionals usually choose a shade one to two tones darker than your natural brow colour if you’re fair, or slightly softer than your hair if you’re very dark. The goal is to add depth, not create a solid, inked-on block. Pairing tinting with a shaping service, such as threading or waxing, can dramatically enhance your facial structure in under an hour, delivering that “I woke up like this” brow definition. If you’re cautious about committing, ask your technician for a lighter first application; you can always deepen the shade at your next appointment once you’ve seen how the colour wears on your skin.
Correcting common eyebrow mistakes and troubleshooting
Even with the best intentions, eyebrow mishaps happen – an overzealous tweezing session, a mismatched shade or an arch placed just a bit too high. The good news is that most issues can be corrected or at least softened with strategic grooming and makeup techniques. Think of this section as your troubleshooting manual for well defined eyebrows: instead of panicking or reaching for the razor, you’ll have a clear plan to guide your next steps. With patience and the right tools, you can turn almost any brow mistake into an opportunity to refine and improve your shape.
Rectifying Over-Arched or overly thin brows
When brows are over-arched, they can create a permanently surprised or severe expression that throws off facial harmony. Similarly, overly thin brows can age the face and make features appear disproportionate. The first step in correcting both issues is to soften the arch and rebuild thickness using cosmetic products while you allow natural regrowth. Use a fine pencil to lower an excessively high arch by filling just above the harsh peak and subtly straightening the curve towards a more gentle, S-shaped or softly angled brow. Avoid removing additional hairs from underneath the arch, as this will only exaggerate the problem.
To correct thin brows, lightly sketch a new outline that aligns with your ideal mapped shape, then fill in using a combination of hair-like strokes and soft shading with powder or pencil. Keep the inner corners soft and avoid overly square fronts, which can look artificial when there is little natural hair. Growth serums, castor oil and a strict no-tweezing policy within the new shape are essential allies during this recovery phase. Over time, as hairs grow back, you can gradually rely less on makeup and more on your restored natural density, maintaining only with minimal shaping.
Addressing uneven brow height and tail positioning
Uneven brow height or mismatched tails can subtly distort your facial proportions, making one eye appear larger or more lifted than the other. To address this, start by reassessing your mapping: ensure both brow starts, arches and tails are marked using the three-point technique. Often, the solution lies not in removing more hair, but in adjusting how you fill and shape each side. For a higher brow, avoid over-defining the lower edge with dark product; instead, concentrate definition on the slightly lower brow, subtly lifting its appearance with careful shading beneath the arch.
If one tail droops lower than the other, resist the temptation to over-pluck; instead, “correct” it with makeup by extending the higher tail slightly outwards and upwards, keeping both tails finishing at a similar, flattering angle. As you refine, step back frequently and view your face as a whole, or take photos to compare both sides objectively. When in doubt, err on the side of under-correction and natural softness – small discrepancies are normal and often unnoticeable to others, whereas overworked brows can draw more attention than the original asymmetry.
Concealer techniques for sharp Under-Brow definition
Concealer is one of the most effective tools for creating sharp, clean under-brow definition without removing additional hair. By subtly highlighting the area beneath the arch and along the lower edge of the brow, you can make the shape appear crisper and more lifted, similar to the effect of a mini eye lift. Choose a creamy concealer that matches your skin tone or is no more than one shade lighter, and apply it with a small, flat brush following the underside of your brow from the inner corner to just beyond the arch. Then, blend the product downward into your eyelid or eyeshadow to avoid any harsh demarcation lines.
This technique is particularly helpful if you’re in a growth phase and have fine, short hairs under the brow that you’re trying not to remove. The concealer visually “erases” these hairs, allowing your mapped shape to stand out clearly. For a more sculpted, evening-ready look, you can also add a tiny amount of highlighter just under the highest point of the arch, blending well so it catches the light without looking frosty. Used thoughtfully, concealer turns your eyebrows into a polished frame for your eyes, enhancing all the careful work you’ve put into shaping, filling and maintaining truly well defined eyebrows that perfectly complement your face.