Your wedding day represents one of life’s most photographed and emotionally charged moments, where every detail matters and your makeup must perform flawlessly from the first kiss to the final dance. The difference between makeup that merely looks good and makeup that endures lies in understanding the intricate relationship between skin preparation, product chemistry, and application techniques. Professional bridal makeup artists know that achieving 12-hour wear requires more than simply applying long-wearing products—it demands a strategic approach that builds durability into every layer.
Modern brides face unique challenges that previous generations never encountered. Between outdoor ceremonies in unpredictable weather, emotional moments that bring tears of joy, and reception celebrations that can last well into the early hours, your makeup must withstand conditions that would challenge even the most resilient formulations. The key lies in creating a foundation that grips without suffocating and sets without cracking, allowing your natural radiance to shine through while maintaining structural integrity throughout the day’s festivities.
Pre-wedding skin preparation and primer selection techniques
The foundation of long-lasting wedding makeup begins weeks before your special day with a comprehensive skin preparation regimen. Professional makeup artists understand that the canvas determines the artwork’s longevity, making pre-wedding skincare as crucial as the makeup application itself. Your skin’s texture, hydration levels, and pH balance directly influence how products adhere and perform throughout extended wear periods.
Exfoliation protocols using alpha hydroxy acids and enzyme treatments
Alpha hydroxy acids, particularly glycolic and lactic acids, create the smooth surface essential for flawless makeup application. Begin incorporating AHA treatments into your routine 4-6 weeks before your wedding, starting with concentrations between 5-10% to avoid irritation. The cellular turnover acceleration removes dead skin cells while promoting the development of fresh, healthy skin that provides optimal makeup adhesion. Professional-grade peels performed 2-3 weeks before your wedding can dramatically improve skin texture, though timing is crucial to avoid any potential sensitivity on your special day.
Enzyme treatments offer a gentler alternative for sensitive skin types, utilising papaya and pineapple enzymes to dissolve dead skin cells without the potential irritation associated with acid-based exfoliation. These treatments can be performed weekly leading up to your wedding, providing consistent surface refinement without compromising your skin’s barrier function. The result is a naturally luminous complexion that serves as the perfect foundation for makeup application.
Hydration layering with hyaluronic acid and Ceramide-Based moisturisers
Proper hydration creates the plump, smooth surface that allows makeup to glide on seamlessly and maintain its appearance throughout the day. Hyaluronic acid’s ability to hold up to 1,000 times its weight in water makes it indispensable for creating the moisture barrier that prevents makeup from settling into fine lines or appearing patchy as the day progresses. Layer lightweight hyaluronic acid serums beneath heavier moisturisers to create multiple hydration levels that support different makeup components.
Ceramide-based moisturisers restore and maintain the skin’s natural barrier function, preventing transepidermal water loss that can cause makeup to appear dry and flaky. These lipid-rich formulations create a protective seal that locks in moisture while providing the smooth surface essential for foundation application. The molecular structure of ceramides closely mimics natural skin lipids, ensuring compatibility and reducing the risk of reactions on your wedding day.
Silicone-based primer application for pore minimisation and oil control
Silicone-based primers create a temporary barrier that smooths skin texture while controlling oil production throughout extended wear periods. The dimethicone and cyclopentasiloxane in these formulations fill in pores and fine lines, creating an artificially smooth surface that prevents foundation from settling unevenly. Strategic primer application focuses on areas prone to breakthrough shine, including the T-zone, chin, and any areas where makeup typically breaks down first.
Application technique significantly impacts primer performance. Use gentle patting motions rather than rubbing to avoid disrupting the silicone film formation. Allow 2-3 minutes for complete setting before foundation application, as premature makeup application can cause the primer to ball
or pill under your foundation. Remember that more primer does not equal more longevity; a thin, even veil is all you need for grip and oil control without suffocating the skin or causing your wedding makeup to slide.
Colour-correcting primer selection for redness and discolouration
Colour-correcting primers allow you to neutralise underlying tone issues before you even reach for concealer or foundation, which means you can use thinner layers and achieve more natural, long-wearing coverage. Green-tinted primers help counteract surface redness from rosacea, broken capillaries, or post-acne marks, while peach and apricot formulas brighten blue or purple under-eye shadows on light to medium skin tones. Deeper complexions often benefit from orange or terracotta correctors that lift hyperpigmentation and uneven tone around the mouth or jawline without turning ashy.
When selecting a colour-correcting primer for your bridal makeup, consider not only the hue but also the formula’s finish and wear time. Oily or combination skin types will do best with lightweight, semi-matte textures, whereas drier or mature skin may prefer hydrating, radiant finishes that prevent cakiness over a long wedding day. Apply colour-correcting primers only where they are needed—such as the sides of the nose, cheeks, or under the eyes—using a small brush or fingertips and blending until the tint is barely visible. This targeted approach ensures that your foundation has less work to do and remains flexible and comfortable from ceremony to last dance.
Foundation matching and long-wear application methods
Once your skin is properly prepared, foundation becomes the structural backbone of your long-lasting wedding makeup. The goal is not a heavy mask but a seamless veil that harmonises with your undertone, resists oxidation, and looks flawless in both daylight and flash photography. Professional artists treat foundation selection and application like engineering: every choice affects durability, comfort, and how the rest of your products interact. By combining accurate shade matching with the right long-wear formulas and tools, you create a complexion that looks like perfected skin rather than visible makeup.
Undertone analysis using MAC studio fix and fenty beauty shade matching
Understanding your undertone is essential for bridal foundation that looks natural in every lighting scenario, from golden-hour portraits to indoor reception flash. Brands like MAC Studio Fix and Fenty Beauty Pro Filt’r offer extensive shade ranges with clear undertone indicators, making them excellent tools for precise analysis. Warm undertones typically suit foundations labeled with letters like W, Y, or golden, while cool undertones match C, R, or rosy designations; neutral undertones fall in the middle and can usually wear both without turning orange or grey.
To determine your best bridal shade, test stripes of foundation along your jawline and blend slightly onto the neck rather than swatching on the hand, which is often a different colour. Evaluate in natural daylight, indoor lighting, and with flash photography to ensure the base does not oxidise, appear ashy, or create a stark contrast between face and body. Many makeup artists keep both MAC and Fenty shades on hand because they mix beautifully, allowing subtle customisation for brides who sit between colours or whose neck and chest differ from their face. When in doubt, choose the slightly lighter, more neutral option and balance with bronzer; this prevents the heavy, over-tanned effect that can date your wedding photos.
Full-coverage foundation techniques with urban decay all nighter and estée lauder double wear
For bridal events that stretch to 12 hours or more, long-wear formulas like Urban Decay All Nighter and Estée Lauder Double Wear are industry favourites. Their high pigment load means you can achieve full coverage with surprisingly thin layers, which is key to avoiding cracking and separation as the skin moves throughout the day. Instead of applying one thick coat, work in sheer, controlled passes, starting at the centre of the face—where most discolouration occurs—and blending outward to maintain a skin-like edge at the hairline and jaw.
Because these formulas set quickly, it’s useful to apply them in sections, especially if you are working on yourself rather than with a professional artist. You can also “cocktail” a pump of Double Wear with a drop of liquid illuminator or hydrating serum for brides who want long wear but prefer a softer, more radiant finish. Once your foundation is in place, lightly press a damp sponge over the skin to remove excess product and merge the base with your skincare and primer layers. This micro-polishing step prevents the heavy, mask-like effect that can appear in close-up photos and makes your bridal makeup more resistant to creasing.
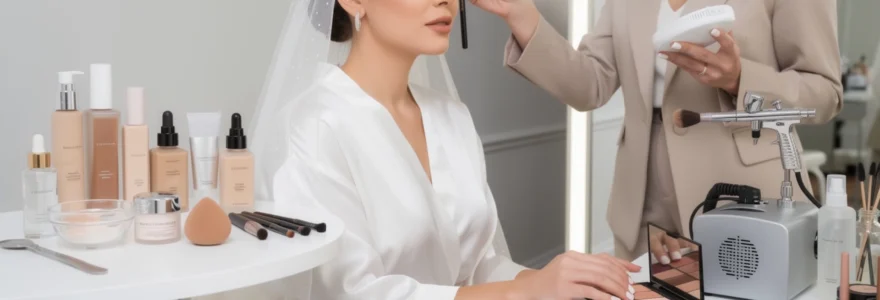
Airbrush application methods using temptu and dinair professional systems
Airbrush foundation using systems like Temptu and Dinair offers an exceptionally thin yet durable layer of coverage, ideal for hot climates, high-humidity venues, or brides who expect intense dancing and movement. The fine mist deposits microscopic droplets that fuse with the skin’s texture rather than sitting on top, resulting in a finish that looks undetectable in person and in ultra-high-resolution photography. Silicone-based airbrush formulas are particularly prized for bridal makeup because they flex with facial expressions while resisting sweat and sebum breakdown.
Effective airbrush application relies on precision and control rather than heavy passes. Hold the gun approximately 6–8 inches from the face and move in small, circular motions, building coverage gradually in areas that require more correction, such as around the nose, chin, and cheeks. Always begin with a clean, well-primed canvas and avoid overloading the gun, as excess product can lead to patchiness or visible speckling on camera. If you’re considering airbrush for your wedding, schedule a trial at least one month beforehand to assess how it wears on your individual skin type across a full day, noting any sensitivity or oxidation so adjustments can be made.
Stippling and buffing techniques with beautyblender and real techniques tools
Not every bride chooses airbrush, and traditional application with tools like the Beautyblender and Real Techniques brushes can achieve equally long-lasting results when used with intention. Stippling brushes create an airbrushed effect by bouncing pigment onto the skin rather than dragging it, which prevents streaks and preserves the integrity of your primer layer beneath. Dense buffing brushes can then be used in small, circular motions to seamlessly blend edges along the hairline, jaw, and ears, ensuring no demarcation lines show in side-profile photos.
A damp Beautyblender or similar sponge is invaluable for bridal makeup because it simultaneously presses foundation into the skin and removes excess product that might otherwise crease or cake over hours of wear. Think of it as a finishing tool rather than your only method of application: apply with a brush for speed and coverage, then refine with the sponge. Always squeeze out any excess water before use to avoid diluting your long-wear foundation. By alternating between stippling, buffing, and pressing motions, you create a thin, even base layer that can support contour, blush, and highlight without breaking apart during your reception.
Waterproof eye makeup architecture and precision techniques
The eye area is often the most emotionally tested zone of bridal makeup, facing tears, humidity, and constant movement. Designing a waterproof eye look is as much about structure and layering as it is about product choice. By treating your eye makeup like architectural construction—primer as the foundation, shadows as the framework, and liner and mascara as the reinforcements—you can ensure that your chosen style, whether soft and romantic or bold and defined, remains intact from vows to final farewell.
Eyeshadow primer application using NARS Pro-Prime and too faced shadow insurance
Eyeshadow primer is non-negotiable for long-wear bridal eye looks, particularly on oily lids or in warm climates. Formulas such as NARS Pro-Prime Smudge Proof and Too Faced Shadow Insurance create a slightly tacky, yet weightless film that grips pigment and prevents creasing for up to 16 hours. Without this anchoring layer, even the most expensive shadows can migrate, fade, or collect in fine lines as the day progresses.
Apply a rice-grain amount of primer to each lid and blend from lash line to just above the crease with your fingertip or a synthetic brush, extending any excess onto the lower lash line where smudging often occurs. Allow 20–30 seconds for the formula to set until it feels almost powdery; applying shadow too soon can lead to patchiness, while waiting too long may reduce grip. For particularly hooded or oily lids, you can lightly dust a skin-tone shadow or translucent powder over the primer in the crease area only, leaving the mobile lid slightly tacky to intensify shimmer and metallic finishes. This controlled placement maintains blendability in the crease while maximising payoff on the lid.
Cut crease and halo eye techniques with pat McGrath labs and charlotte tilbury palettes
Advanced techniques like the cut crease and halo eye can dramatically enhance your bridal eye shape and create dimension that photographs beautifully from every angle. Using highly pigmented palettes from brands such as Pat McGrath Labs and Charlotte Tilbury ensures that the effort you invest in blending and sculpting retains its impact throughout the day. A soft cut crease defines the socket line, making eyes appear larger and more lifted, while a halo eye places luminosity at the centre of the lid to give a rounded, spotlight effect that looks stunning in close-up shots.
To create a long-wear cut crease, start with a mid-tone matte shade in the crease using a small, fluffy brush, gradually building depth with deeper neutrals while keeping the lid itself relatively bare. Then use a small amount of concealer or a light cream base to “cut” along the crease line before pressing on a shimmer or satin shade from your chosen palette. For a halo eye, apply deeper mattes to the inner and outer corners, leaving the centre of the lid free for a metallic or sparkle shade that is patted, not swept, into place for maximum adherence. In both cases, avoid overly heavy glitter that can flake into the eyes; instead, opt for finely milled shimmer formulas that behave more like light-catching veils than loose particles.
Waterproof mascara layering using benefit they’re real and L’Oréal voluminous
Bridal mascara must resist tears, heat, and potential rain without becoming brittle or flaking into your photos. Layering a long-wear formula like Benefit They’re Real with a waterproof staple such as L’Oréal Voluminous Waterproof can provide both definition and durability. Think of this as designing a lash wardrobe: the first coat offers separation and length, while the second “seals” the structure to withstand emotional moments and humidity.
For best results, curl lashes first and apply a thin coat of your non-waterproof or tubing mascara to shape and define. While this is still slightly tacky, follow with a light layer of waterproof mascara focused on the mid-lengths and tips, where smudging is least likely. This two-step method avoids applying waterproof formulas directly to the lash root, making removal gentler on the delicate lash line after your wedding. If you prefer false lashes, choose individual or half-strip clusters and bond them with a waterproof adhesive, then blend real and faux lashes together with a final, minimal sweep of waterproof mascara.
Precision eyeliner application with stila stay all day and kat von D tattoo liner
Eyeliner frames the eyes and anchors your lash line in photos, but poorly chosen formulas can smear with the first happy tear. Liquid pens such as Stila Stay All Day and Kat Von D Tattoo Liner are renowned for their pigment density and budge-proof performance, making them favourites among bridal artists. Their fine brush tips allow for razor-sharp wings, tightlining, and micro-adjustments that flatter each unique eye shape.
Begin by mapping your liner with small, connected dashes rather than attempting one sweeping stroke; this reduces errors and keeps the line thin and elegant. For hooded or deep-set eyes, keep the wing short and slightly upward-angled so it remains visible when the eyes are open, avoiding thick lines that can close off the eye. Once satisfied, allow 15–20 seconds for the liner to fully set before blinking excessively or curling the lashes. For extra longevity, you can trace a matching eyeshadow over the liner with an angled brush to “lock” the pigment in place—much like setting cream products with powder elsewhere on the face.
Setting and sealing strategies for 12-hour wear
Even the most meticulous application requires intelligent setting and sealing to withstand a full wedding day of hugs, heat, and movement. Long-lasting bridal makeup relies on the interplay between powders and setting sprays, each used in deliberate, minimal layers to maintain flexibility. Too much powder can create a dry, ageing effect on camera, while skipping it altogether risks mid-day shine and breakdown. The objective is to stabilise your base while preserving the skin’s natural dimension.
Start by targeting areas prone to oil and movement with a finely milled translucent powder, pressing it into the skin with a puff rather than sweeping with a brush. This pressing technique compacts the pigment particles into your foundation, similar to setting a tile with grout, creating a smooth, long-wear surface. Reserve tinted or pressed powders for strategic use around the perimeter of the face, where you want a soft-focus effect without flattening the centre. Over-application in this step is one of the most common reasons bridal makeup looks heavy in photographs, so err on the side of less and build only where necessary.
Setting sprays function like a final top coat, melding all the layers of your wedding makeup into a cohesive whole. Long-wear formulas often contain film-forming polymers that create a flexible mesh over the skin, helping blush, bronzer, and highlight adhere through hours of dancing and temperature changes. For maximum durability, consider adopting a “sandwich” technique: light mist after foundation and concealer, another mist after powder, and a final spritz once all colour products are complete. Hold the bottle at least 20–25 centimetres away, mist in an X and T pattern, and allow each layer to dry naturally to avoid disturbing the finish.
Because flashback is a concern in bridal photography, choose powders that are explicitly labeled flash-friendly and avoid heavy baking with high-silica or SPF-heavy formulas under the eyes. A small amount of brightening powder can be beautiful, but thick, undiffused layers may appear stark white in flash photos. By combining selective powder placement with a high-performance setting spray, you create a breathable, resilient shield that keeps your flawless wedding makeup intact well past the cutting of the cake.
Touch-up kit essentials and emergency repair protocols
Even with the best long-wear products and techniques, real life still happens: kisses leave lipstick on glasses, the weather shifts, and emotions run high. A well-curated bridal touch-up kit serves as your insurance policy, allowing you to address minor issues quickly without disrupting the overall structure of your makeup. Think of it less as a full toolbox and more as a precision repair kit, focusing on the small items that make the biggest difference on camera.
Core touch-up essentials typically include blotting papers, a mini pressed powder, your chosen lipstick or gloss, a lip liner, cotton buds, and a travel-size setting spray. Blotting papers are particularly crucial for long wedding days because they remove excess oil without adding more product; always blot before applying any additional powder to prevent caking. A lightweight, finely milled pressed powder can then be used sparingly around the nose, forehead, and chin to restore a soft-focus finish. To refresh your lip colour, re-trace the lip line, press in a thin layer of lipstick with your fingertip or brush, and add gloss only if desired for comfort and shine.
Emergency repair protocols are simply step-by-step plans for the most common mishaps, so you or a bridesmaid can fix issues swiftly. Mascara smudge beneath the eye? Allow it to dry completely, then gently flick it away with a dry cotton bud before re-brightening the area with a touch of concealer. Foundation separation around the nose or mouth after hours of smiling and eating? Press a tiny amount of moisturiser or setting spray into the area with a clean sponge, then lightly stipple on a small amount of foundation and tap in with your fingertip. By anticipating these scenarios in advance, you avoid panic in the moment and keep your flawless wedding makeup looking freshly applied.
Photography-ready makeup considerations for professional wedding documentation
Professional cameras, high-resolution lenses, and varied lighting setups can reveal details that are invisible to the naked eye, which is why photography-specific planning is essential for bridal makeup. Flash photography tends to flatten features and emphasise contrast, so your wedding makeup should incorporate more structure and dimension than everyday looks while still appearing soft in person. It’s a delicate balance: you want definition that reads clearly on camera, but not harsh lines or overly reflective finishes that distract from your natural beauty.
One of the most important considerations is avoiding products that create flashback—an unwanted white cast caused by certain SPF ingredients and high-silica powders. Test your full bridal look ahead of time by taking photos with and without flash in different lighting conditions, including indoors under warm bulbs and outdoors in daylight. Pay attention to how your foundation, under-eye area, and any heavily powdered zones appear; if they look significantly lighter than your neck or chest in photos, adjust your product selection or application amount. Opting for foundations designed for photography, along with moderate SPF worn beneath rather than built into the base, can help prevent this issue.
Strategic highlighting and contouring also play a vital role in photography-ready wedding makeup. Use matte or satin contour shades to subtly sculpt the cheekbones, jawline, and temples, avoiding overly warm or grey tones that can look muddy on camera. Reserve shimmer for the high points of the face—tops of the cheekbones, bridge (not tip) of the nose, and cupid’s bow—and choose finely milled formulas that offer a soft glow rather than chunky sparkle. Brows should be defined but not overdrawn, framing the eyes to anchor your expressions in photos. By approaching your bridal makeup through the lens of the camera as well as the human eye, you ensure that your look remains flawless, cohesive, and timeless in every image captured on your wedding day.